Open Database Connectivity (ODBC) is Microsoft's strategic interface for accessing data in a heterogeneous environment of relational and non - relational database management systems. Based on the Call Level Interface specification of the SQL Access Group, ODBC provides an open, vendor- neutral way of accessing data stored in a variety of proprietary personal computer, minicomputer, and mainframe databases.
ODBC alleviates the need for independent software vendors and corporate developers to learn multiple application programming interfaces. ODBC now provides a universal data access interface. With ODBC, application developers can allow an application to concurrently access, view, and modify data from multiple, diverse databases. ODBC is a core component of Microsoft Windows Open Services Architecture.
To use ODBC you need a data source better known as DSN (data source name)
Data Source Name (Source: http://en.wikipedia.org/wiki/Data_source_name)
This is an ODBC term that refers to the name of the database to which you're connecting. A data source name or DSN is a string that has an associated data structure used to describe a connection to a data source. DSN attributes may include the following, but are not limited to:
- Name of the data source
- Location of the data source
- Name of a driver which can access the data source
- User ID for data access (if required)
- User password for data access (if required)
There are three type of DSN
- User DSN
- System DSN or Machine DSN
- File DSN
- User DSN - The most common type of DSN. Stores information about how to connect to a specific data source. It can be used only by the current user on the current machine.
- System DSN - Like the User DSN, the System DSN stores information about how to connect to a specific data source, but is available to all users on a particular machine. It is local to a computer, rather than dedicated to a user. The system, or any user having privileges, can use a data source set up with a system DSN. This is the preferred DSN type for Data Security.
- File DSN - A data source stored in a file that can be shared among all users who have the same ODBC drivers installed. These data sources need not be dedicated to a specific user or local or in network to a computer.
How to create a Data Source Name (DSN) in Windows
You can create a DSN for your data source as follows:
Step 1:
Go to Control Panel. On Windows NT systems, double-click the ODBC Data Sources icon. On Windows 7/XP systems, open the Administrative Tools folder and then double-click the Data Sources (ODBC) icon. On some systems, the icon may appear labeled as ‘32bit ODBC’.

Once
you double click on the highlighted icon from the above screen shot, a new
window ‘ODBC Data Source Administrator’
will appear.

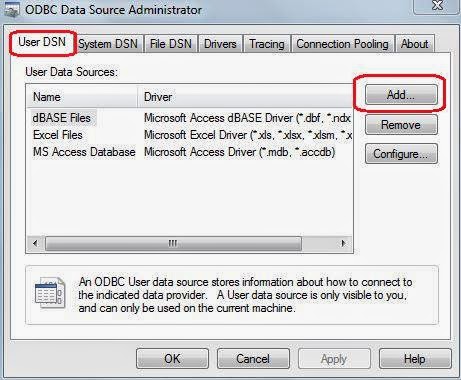
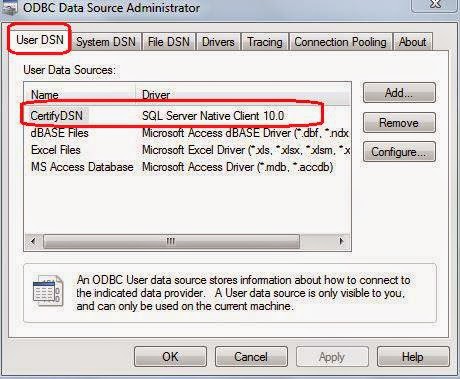
Step 2:
Select the User DSN tab and click Add. (You must be logged in as the Administrative User or else you need the required privileges to create a DSN). Refer the screen shot below.
Step 3:
After pressing on ‘Add’ button a new window ‘Create New Data Source’ will appear. Select your database from Name column on this window and press ‘Finish’ button. Refer the screen shot below.

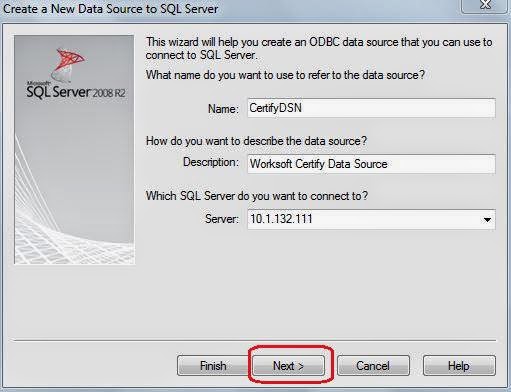
Step 4:
Once you select your database and press the ‘Finish’ button a window for creating a DSN will appear. Here you need to enter the below.
After
entering all this information press the ‘Next’ button. Refer the below screen
shot.
Step 5:
Then in the next window select the ‘with SQL Server authentication’ radio button and enter your database credentials. Refer the below screen shot.

Step 6:
If your credential is correct then pressing ‘Next’ from the above screen shot will take you to the next screen. Make sure that ‘Change the default database’ option is unchecked and Press the ‘Next’ button on this screen and after that press the ‘Finish’ button to complete the setup. Refer the below screen shot.


Step 7:
After completing the setup i.e. pressing the ‘Finish’ button from the above step, a new screen will appear from where you can test your DSN whether correctly configured or not. If you want to test the DSN you created press the ‘Test Data Source’ button. If everything is fine then you will get a screen with a Test Result which will give you a success message. Once you get this success message press to ‘OK’ button to complete the setup. Refer the below screen shots.

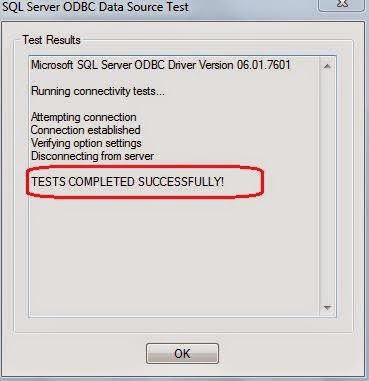

Step 8:
Now you can see the DSN which you created from Step 4 is showing in the respective area.
ODBC Data Object in Certify
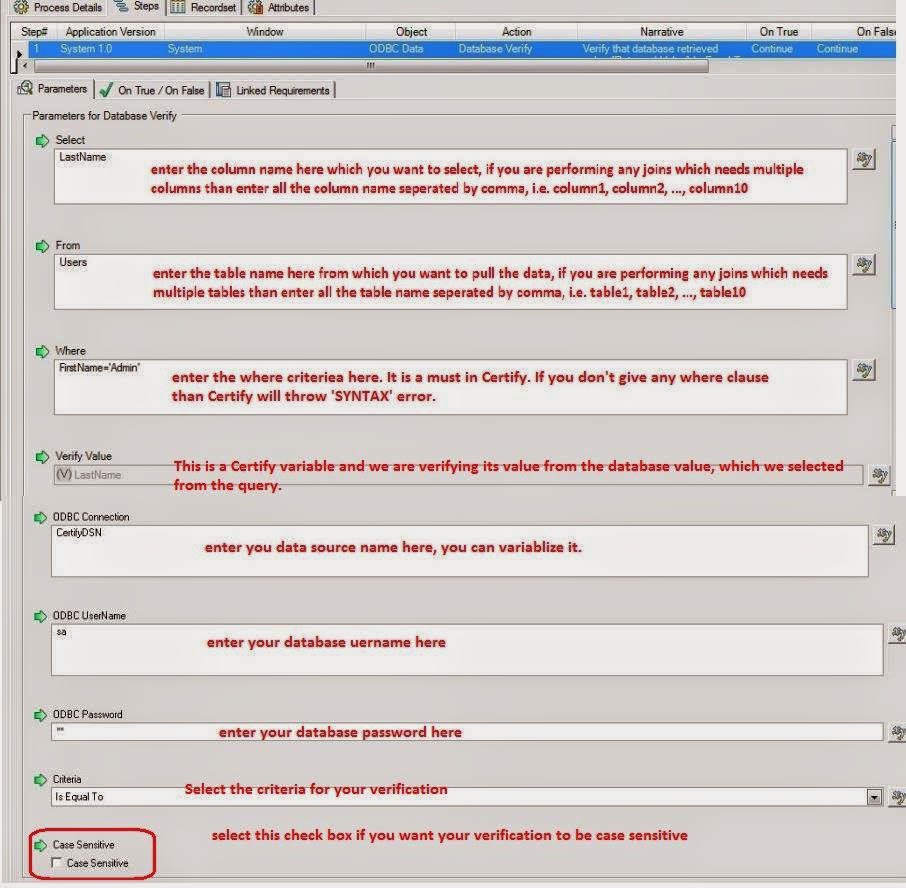
The ODBC Data Object allows you to execute a valid SQL query during a process execution to store a data value from the underlying database and/or validate the value between Certify and database. You can query a single value per process step. For example, you can query the value of a user name in one step and then query the password for that user name in the next step. Your query can be as complex as necessary to get the value you need.
There are two actions available for this object in Certify.
These
actions do not write to the database, but reads from the database and then
writes the value to a variable in Certify.
Important – before writing your query makes sure that your query should return a single row and a single column as a result. Certify will throw an error if your query returns more than a single row/column as a part of query result.
Database Store Action - This action allows you to execute a valid SQL query during a process execution and stores the output value in a Certify variable.
For example - If you want to know the total number of customers you have in a certain region or the total number of users you have in the system, use the Database Store action.
For the above example query will be like this:
Select Count(*) from <<Table>>;
Now refer the below screen shot how to perform this query in Certify.

Database Verify Action - The action allows you to
execute a valid SQL query during a process execution to verify the given value with
the database value. This action reads from the database and then compares the
value to the specified criteria. You can query a single value per process step.
Your query can be as complex as necessary to get the value you need.
For example - You can verify the value of Last Name for the given user and let’s assume that you are getting the last name value for that user from somewhere (application).
Contributed by Gautam
You can create a DSN for your data source as follows:
Step 1:
Go to Control Panel. On Windows NT systems, double-click the ODBC Data Sources icon. On Windows 7/XP systems, open the Administrative Tools folder and then double-click the Data Sources (ODBC) icon. On some systems, the icon may appear labeled as ‘32bit ODBC’.
Select the User DSN tab and click Add. (You must be logged in as the Administrative User or else you need the required privileges to create a DSN). Refer the screen shot below.
After pressing on ‘Add’ button a new window ‘Create New Data Source’ will appear. Select your database from Name column on this window and press ‘Finish’ button. Refer the screen shot below.
Once you select your database and press the ‘Finish’ button a window for creating a DSN will appear. Here you need to enter the below.
1) Name – your data source name (DSN). It can be any name but
better to give some meaningful name. Remember you cannot create a duplicate
DSN
2) Description – some information about your data source (optional).
3) Server – IP address of your database.
Then in the next window select the ‘with SQL Server authentication’ radio button and enter your database credentials. Refer the below screen shot.
If your credential is correct then pressing ‘Next’ from the above screen shot will take you to the next screen. Make sure that ‘Change the default database’ option is unchecked and Press the ‘Next’ button on this screen and after that press the ‘Finish’ button to complete the setup. Refer the below screen shot.
After completing the setup i.e. pressing the ‘Finish’ button from the above step, a new screen will appear from where you can test your DSN whether correctly configured or not. If you want to test the DSN you created press the ‘Test Data Source’ button. If everything is fine then you will get a screen with a Test Result which will give you a success message. Once you get this success message press to ‘OK’ button to complete the setup. Refer the below screen shots.
Now you can see the DSN which you created from Step 4 is showing in the respective area.
The ODBC Data Object allows you to execute a valid SQL query during a process execution to store a data value from the underlying database and/or validate the value between Certify and database. You can query a single value per process step. For example, you can query the value of a user name in one step and then query the password for that user name in the next step. Your query can be as complex as necessary to get the value you need.
There are two actions available for this object in Certify.
1. Database
Store Action
2. Database
Verify Action
Important – before writing your query makes sure that your query should return a single row and a single column as a result. Certify will throw an error if your query returns more than a single row/column as a part of query result.
Database Store Action - This action allows you to execute a valid SQL query during a process execution and stores the output value in a Certify variable.
For example - If you want to know the total number of customers you have in a certain region or the total number of users you have in the system, use the Database Store action.
For the above example query will be like this:
Select Count(*) from <<Table>>;
Now refer the below screen shot how to perform this query in Certify.
For example - You can verify the value of Last Name for the given user and let’s assume that you are getting the last name value for that user from somewhere (application).
Contributed by Gautam